 ‘Simplicity is the ultimate sophistication.’
– Leonardo da Vinci
As a recent hire on the Engineering Productivity team here at StreamSets, my early days at the company were marked by efforts to dive head-first into StreamSets Data Collector (SDC), a fast data ingestion engine, to build data pipelines. As it turns out, the Docker images we publish for SDC were the easiest way to explore its vast set of features and capabilities, which is exactly why I am writing this blog post.
Without further ado, let’s get started.
Start a Docker Container with StreamSets
To start a Docker container with the most recent release of StreamSets Data Collector just run the following command.
$ docker run --restart on-failure -p 18630:18630 -d --name sdc streamsets/datacollector
Here are the options we specified (for a full list, check out the image notes on Docker Hub):
-d |
Create Docker container in the background in detached mode |
--name |
Name for this container |
-p |
Publish container’s port 18630 on host’s 18630 |
--restart on-failure |
Restart only if the container exits with a non-zero exit status |
If all goes well, running docker ps will show output like the following:
$ docker ps
CONTAINER ID        IMAGE                      COMMAND                  CREATED             STATUS              PORTS                      NAMES
fd863929e26c        streamsets/datacollector   "https://streamsets.b-cdn.net/docker-entrypoin..."   12 minutes ago      Up 12 minutes       0.0.0.0:18630->18630/tcp   sdc
Voila! We have successfully created a Docker container with Data Collector. Pretty simple. Right?
Note the port 18630. This is the host port to which Docker has published the Data Collector container’s port 18630. We can verify that the service has started by using a web browser pointed to `localhost:18630`
StreamSets enables data engineers to build end-to-end smart data pipelines. Spend your time building, enabling and innovating instead of maintaining, rewriting and fixing.
Working with Data Collector
Now that we have access to the web UI, we can start playing with all the cool capabilities that SDC has to offer. For someone new, a great place to start would be our tutorials on GitHub that contain step-by-step guides for everything from creating and running a data pipeline to more advanced operations like data manipulation.
Here are a few tricks I learned along the way which helped me a lot.
Exploring the Docker Container
After we have created the Docker container, we might want to take a look around (e.g. just to see how files are laid out). One simple way is to run the following command to start a Bash session inside the container:
$ docker exec -it sdc bash
Once we are inside, we can run whatever commands we need and, when we’re done, can use exit (or CTRL+D) to come back to the host:
$ docker exec -it sdc bash
bash-4.3$ ls
bin home mnt run usr
data lib opt sbin var
dev lib64 proc srv
docker-entrypoint.sh logs resources sys
etc media root tmp
bash-4.3$ pwd
/
bash-4.3$ exit
exit
$
Restarting Data Collector
One common gotcha with running StreamSets in Docker happens when we need to install additional stage libraries. In the web UI, go ahead and select a library and then click the “Install” icon (see documentation for details). At this point, we would see a dialog like the following:
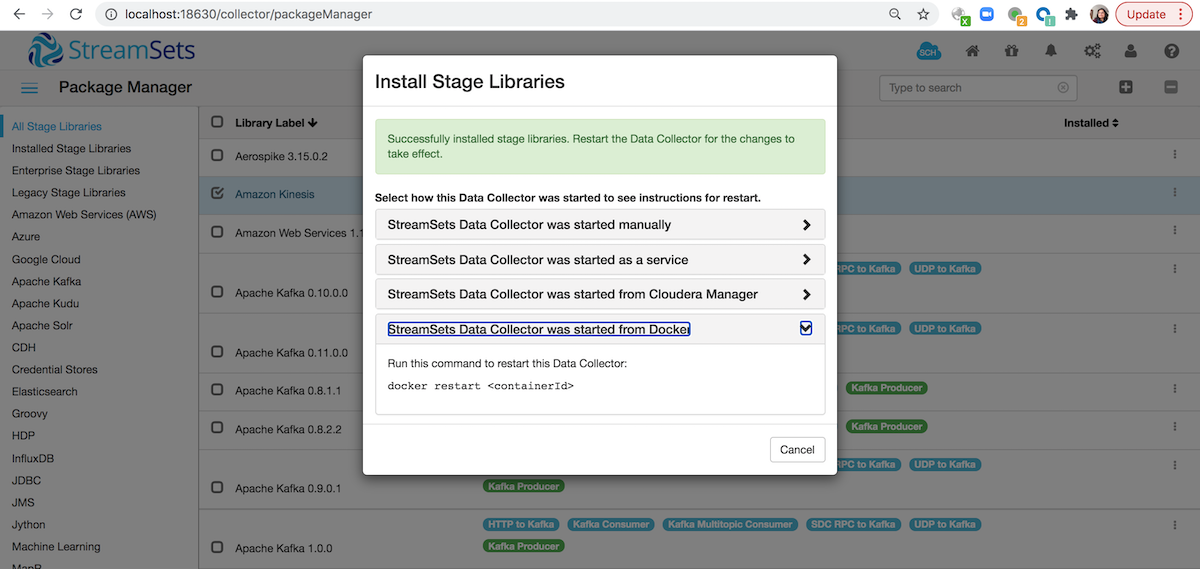
Click on `StreamSets DataCollector was started from Docker` option highlighted above and copy the command as shown and click on cancel. Then to restart SDC, go back to your terminal window and execute the command docker restart <containerId> after replacing <containerId> with your docker container’s id.
Looking into Logs
While exploring, if we do something that ends up crashing Data Collector, here is how to see its logs along with some sample output:
$ docker logs sdc
Java 1.8 detected; adding $SDC_JAVA8_OPTS of "-XX:+UseConcMarkSweepGC -XX:+UseParNewGC -Djdk.nio.maxCachedBufferSize=262144" to $SDC_JAVA_OPTS
Logging initialized @1296ms to org.eclipse.jetty.util.log.Slf4jLog
2017-07-20 16:07:20,542 [user:] [pipeline:] [runner:] [thread:main] INFO Main - -----------------------------------------------------------------
2017-07-20 16:07:20,545 [user:] [pipeline:] [runner:] [thread:main] INFO Main - Build info:
2017-07-20 16:07:20,545 [user:] [pipeline:] [runner:] [thread:main] INFO Main - Version : 2.6.0.0
….
Running on URI : 'http://b40764fb427f:18630'
2017-07-20 17:18:55,369 [user:] [pipeline:] [runner:] [thread:main] INFO WebServerTask - Running on URI : 'http://b40764fb427f:18630'
$
If StreamSets is running, we could also tail these by adding in the `-f` argument to `docker logs`.
Removing Data Collector
To clean up our instance of StreamSets Data Collector and all the resources it is using, just run the following command. Keep in mind that this will remove our Data Collector instance and we shall not be able to get back any data/logs/resources that were created in the process.
$ docker rm -f sdc
Conclusion
In this blog post, we have reviewed how to start StreamSets Data Collector in a Docker container, how to use it (along with a few tricks), and finally, how to remove it; a complete cycle of working with StreamSets running in Docker.