In two of my previous blogs I illustrated how easily you can extend StreamSets Transformer using Scala: 1) to train Spark ML RandomForestRegressor model, and 2) to serialize the trained model and save it to Amazon S3.
In this blog, you will learn a way to train a Spark ML Logistic Regression model for Natural Language Processing (NLP) using PySpark in StreamSets Transformer. The model will be trained to classify given tweet as a positive or negative sentiment.
Prerequisites
- StreamSets Transformer version 3.12.0+
- PySpark Processor Prerequisites
- NumPy library installed on the same machine
StreamSets Transformer Pipeline Overview
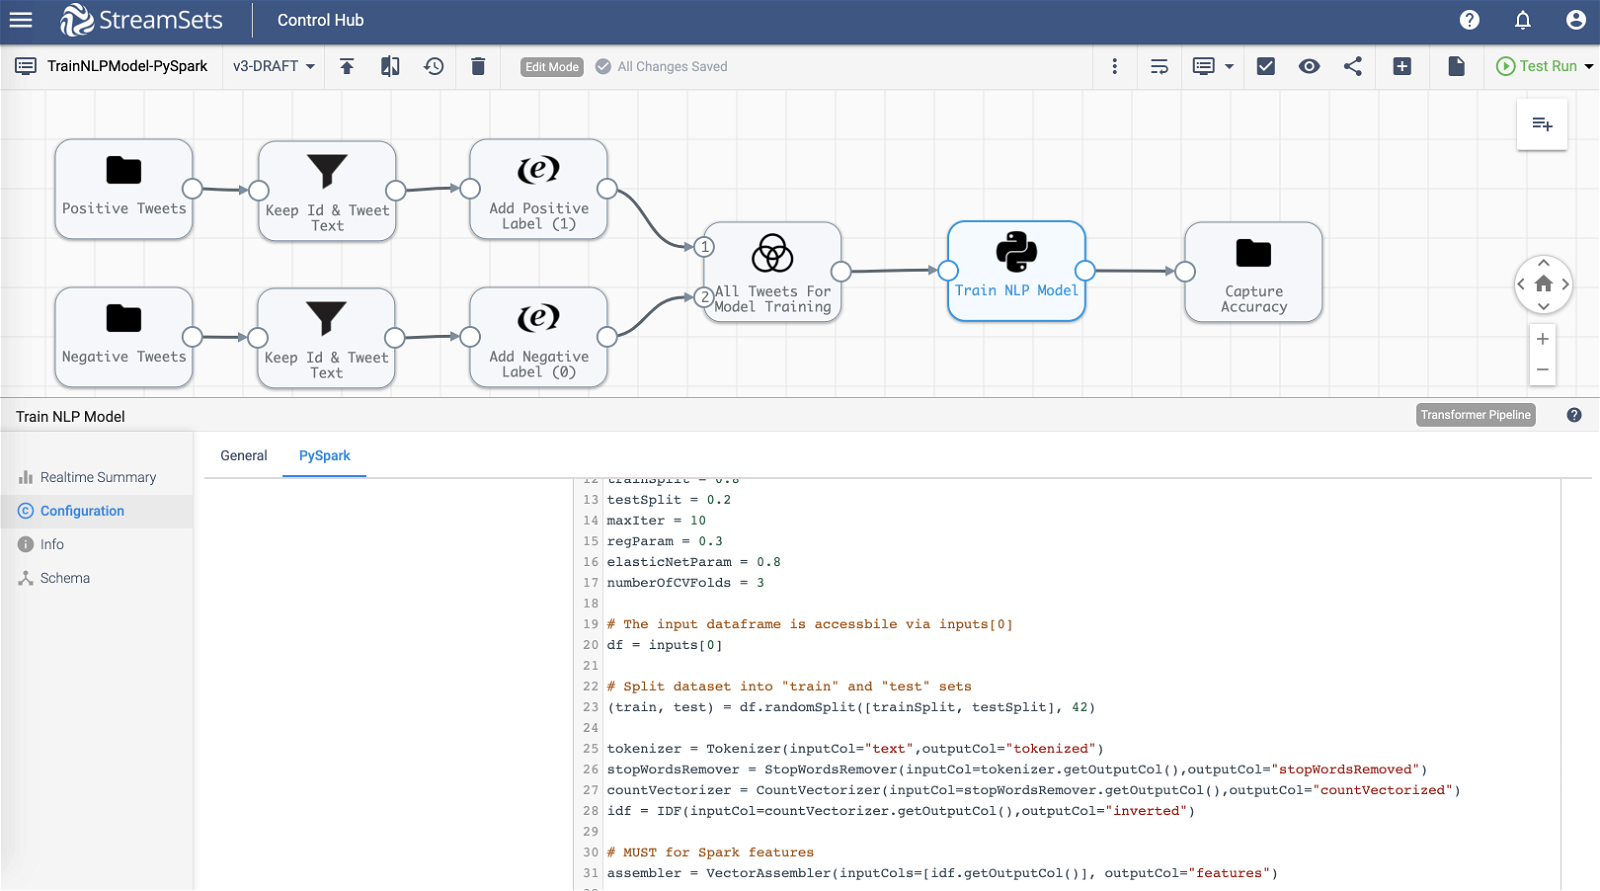
Before we dive into the details, here is the pipeline overview.

Input
- Two File origins are configured to load datasets that contain positive and negative tweets that will be used to train the model.
Transformations
- Field Remover processor is configured to only keep tweet Id and tweet text fields because the other fields/values of a tweet aren’t used to train the model in this example.
- Spark SQL Expression processor enables us to add true (sentiment) “label” column with values 1 and 0 to the two dataframes. This label column will be used for training the model.
- Union processor is configured to combine the two dataframes into one that will be used for training the model.
- PySpark processor is where we have the code to train and evaluate the model. (See below for details.)
Output
- File destination stores model accuracy–which is the output dataframe generated by PySpark processor.
PySpark Processor
Below is the PySpark code inserted into PySpark processor >> PySpark tab >> PySpark Code section. It basically takes the input data(frame) and trains Spark ML Logistic Regression model based on it–the code details include train-test split, tokenizing text, removing stop words, setting up hyperparameter tuning grid, cross validation over n folds, training on “train” split dataset, and evaluating the trained model on “test” split dataset. (See in-line comments for a walk-through.)
# Import required libraries
from pyspark.ml.feature import VectorAssembler, StopWordsRemover, Tokenizer, CountVectorizer, IDF
from pyspark.ml.linalg import Vectors
from pyspark.ml import Pipeline, PipelineModel
from pyspark.sql.functions import *
from pyspark.ml.tuning import CrossValidator, ParamGridBuilder
from pyspark.ml.evaluation import MulticlassClassificationEvaluator
from pyspark.ml.classification import LogisticRegression
from pyspark.sql.types import FloatType

# Setup variables for convenience and readability
trainSplit = 0.8
testSplit = 0.2
maxIter = 10
regParam = 0.3
elasticNetParam = 0.8
numberOfCVFolds = 3

# The input dataframe is accessible via inputs[0]
df = inputs[0]

# Split dataset into "train" and "test" sets
(train, test) = df.randomSplit([trainSplit, testSplit], 42)

tokenizer = Tokenizer(inputCol="text",outputCol="tokenized")
stopWordsRemover = StopWordsRemover(inputCol=tokenizer.getOutputCol(),outputCol="stopWordsRemoved")
countVectorizer = CountVectorizer(inputCol=stopWordsRemover.getOutputCol(),outputCol="countVectorized")
idf = IDF(inputCol=countVectorizer.getOutputCol(),outputCol="inverted")

# MUST for Spark features
assembler = VectorAssembler(inputCols=[idf.getOutputCol()], outputCol="features")

# LogisticRegression Model
lr = LogisticRegression(maxIter=maxIter, regParam=regParam, elasticNetParam=elasticNetParam)

# Setup pipeline -- pay attention to the order -- it matters!
pipeline = Pipeline(stages=[tokenizer, stopWordsRemover, countVectorizer, idf, assembler, lr])

# Setup evaluator -- default is F1 score
classEvaluator = MulticlassClassificationEvaluator(metricName="accuracy")

# Setup hyperparams grid
paramGrid = ParamGridBuilder().addGrid(lr.elasticNetParam,[0.0]).addGrid(countVectorizer.vocabSize,[5000]).build()

# Setup cross validator
cv = CrossValidator(estimator=pipeline, estimatorParamMaps=paramGrid, evaluator=classEvaluator, numFolds=numberOfCVFolds)

# Fit model on "train" set
cvModel = cv.fit(train)

# Get the best model based on CrossValidator
model = cvModel.bestModel

# Run inference on "test" set
predictions = model.transform(test)

# Return accuracy as output dataframe
accuracy = classEvaluator.evaluate(predictions)
output = spark.createDataFrame([accuracy], FloatType()).withColumnRenamed("value","Accuracy")
Assuming all goes well, the “output” dataframe will contain “Accuracy” written out to a file in a location configured in the File destination labeled “Capture Accuracy” in the above pipeline. And, for example, if Data Format of the File destination is set to JSON, the contents of the JSON file might look similar to:
{“Accuracy”:0.97682446}
To reiterate what I’ve mentioned in my other ML related blogs, it goes without saying that the model accuracy will depend on the size and quality of the train and test datasets as well as feature engineering and hyperparameter tuning–which isn’t exactly the point of this blog but to showcase how StreamSets Transformer can be extended for other use cases.
Pipeline And Datasets on GitHub
If you’d like to try this out for yourself, download the pipelines and datasets from GitHub.
Summary
In this blog you learned how easily you can extend StreamSets Transformer’s functionality. In particular, you learned how to incorporate custom PySpark code to train
While the platform is easily extensible, it’s important to note that the custom code still leverages underlying, built-in features and power of StreamSets Transformer. To name a few:
- Executing on any Spark cluster, on-prem on Hadoop or on cloud hosted Spark services, for example, Databricks.
- Progressive error handling to learn exactly where and why errors occur, without needing to decipher complex log files.
- Highly instrumented pipelines that reveal exactly how every operation, and the application as a whole, is performing.
To learn more about StreamSets Transformer visit our website, refer to the documentation, and download the binaries.